

Need a necessary file to submit, but the power button not working pc is not turning on? In most cases, the fault can be in the power button switch that needs replacement. But some other reasons may be causing the power button failure too?
We have found many such cases and got some basic to major reasons behind this type of problem.
However, there is obviously some solution that you can try all by yourself. So, without any further due, let’s take you to the deep.
Possible Causes behind Power Button Not Working PC
At first, take a look at the significant causes that might be causing the power button not to work.
- Any connection loose with the power source
- Power button switch problem
- Rust in button switch
- Any faulty connector on the motherboard
- Faulty motherboard
These are the most probable causes for the pc power button not working. Besides, any major issue in your system can be the culprit of some severe problem.
So, when you just find out your computer power button not working, go check each issue to be sure of the root of the problem at first.
But how to check? We’ll help you through a step-by-step procedure to check and find out from the root. And fix them with the easiest and safe ways.
Get ready to be the kind of techie to solve your power button issue with our tech experts’ guide. And save your bucks from a computer technician from looting you for such a minor issue that you might never know.
How to Fix PC Power Button Not Working
Are you sure that the power button is the only culprit preventing your computer from turning on? Can’t decide? Everything seems terrific?
Don’t worry at all. Here, we’ll be discussing all the steps for a newbie to a professional. You can check your pc and find out the reason at first. After that, you can go for the exact fix to try out.
However, if it’s the case that your PC power button sometimes not working, you should perform the tests mentioned below.
At first, let’s find out what trouble your pc is suffering from.
Make Sure of the Power Source & Cable Connections
The very first and foremost thing you need to check is the power source. Make sure the pc is getting proper power.
- Check your cables and the wires. Hopefully, there is not any bent or torn.
- Check the UPS (if any) cables and the power from the UPS is good in all.
- Check the AC adapter if you’re using a laptop and make sure there is no wire break.
All the connections are okay but still the power button not working? Go for the next test.
Make Sure the Power from Your Wall Outlet
Sometimes improper connection or any short circuit in multi-plug can cause the power button not to turn on. In this case, perform a lamp test to ensure there is a smooth flow of current directly from the wall outlet.
So, how to do a lamp test? A test called lamp test is the way to check the proper connection from the wall outlet.
- Unplug all the computer connections from the outlet.
- Now, connect a small lamp to the outlet and see if the lamp lights up properly or not. (Make sure the lamp is good)
If the lamp lights up well, then relax there is no issue with the main outlet.
But if the lamp is lightning low or blinking, then there is a low voltage issue with your power source. Call your electrician to fix it or check the main socket of your house’s electricity.
Another way you can try here to check the outlet power is using a multimeter.
If all that is okay, then go for checking the power button switch.
Inspect the Power Button Switch
If you find no faulty connections or connection break from the main source, then start checking your power button switch.
The mentioned inspection was necessary as many seem to be unaware of the faulty connection and go for direct replacing power button switch that makes unnecessary spending.
So, why go for spending at first where you can find the issue and fix yourself? Let’s proceed with finding your culprit power button switch.
Step-1: Remove Short Out Power
To check your power button switch, you should drain the power that may be stuck for frequent pressing of the power button. For this-
- Open the side panel of your PC casing.
- After that, open the front bezel of the case
- Now, find the wire from the power button switch connected to the connector on the motherboard- ‘Power SW.’ Gently take out that connector.
- Well, you have to press the power without the connector now. So, how can you do this? We all have hairpins or paperclips at home, right? So, use 2 paperclips or hairpins and press and hold on the connector pins. Here, you can use a screwdriver also.
- After holding the pins for 2 to 3 seconds, release them. This will release all the shorted power from your PC.
Step-2: Clean the Connector Area
Sometimes too much dirt or rust in the power button connector can prevent the pc from getting power. It happens if you’re not using the PC for long.
In that case, clean the connectors and try to turn on the pc.
If it does not work, go for the next step.
Step-3: Turn on PC without Power Button
Now, you have to try to turn on the pc without the power button.
It’s just a similar way that we tried to remove shorted-out power.
Using a screwdriver or paperclip, press the connector pins of the power button on the motherboard.
If you find your motherboard and other parts running, meaning the pc turns on, then boom! You got your culprit-the power button switch.
If you are 100% sure after these steps that the power button is not working, you can turn on the pc without the power button and then replace the power button when you can.
Easy Trick to Turn on When PC No Response to Power Button
Do you need to turn on your pc now, and you don’t have any spare power button switch? Then, try this quick fix to turn on your pc until you buy or replace the power button switch.
How to Turn On a Computer without Power Button?
Yes, this is the most straightforward method to turn on PC without power button. So, how can you do that? It’s pretty easy.
- Remove the casing if you have not removed it yet.
- Gently take out the POWER SW connector from the motherboard.
- Similarly, disconnect the Reset SW connector cable from the motherboard pin.
- Now, insert the Reset SW connector to the pin from where you just took out the Power SW written connector cable.
- Plugin the power supply cable to the pc and press the reset button
- See if the pc turns on or not.
Is the fan moving? Is it turning on?
Kudos! You just bypassed the power button switch on your PC. And now you can turn on your pc without the power button switch.
Still, your PC is not turning on? Then, your reset button switch also needs replacement.
But make sure to go through the test to power up the PC directly from the motherboard connector without any button switch.
If you’re very sure that there is no issue with the hardware, then replacing the power button switch will fix the issue of the power button not working on PC.
How to Replace Power Button Switch on PC?
Did you buy a power button switch? Want to replace yourself? It’s not that tough. You can easily replace your faulty power button switch.
However, you can easily find this type of 2 pin power button switch in stores at an affordable price.
Some other power button switches also come as all in one remote switch button if you find your power button switch is not an individual switch button.
To replace the power button switch –
- Take out the casing from both sides. If there’re any screws, loosen them and remove the panel.
- With a bit of hardship, take out the front panel.
- Now, remove the power button connector/ header written –Power SW.
- Take out the button switch from the back of the front panel. Here, the switch can be a bit hard to remove as it is set glued. Try to remove the glue area.
- Place the new button switch where the old button switch was glued
- Connect the connector/header point to the motherboard pin where the power SW connector was connected.
- Plugin the power supply cable and press the button switch, and test if it turns on.
- If it does not turn on, disconnect and reconnect the connector after some time. It will work.
Fix When PC No Response To Power Button But Button Switch Is Good
However, if you find the computer does not turn on when pressing power button, the power button switch is not at fault. The real culprit can be either the PSU or the motherboard.
So, we were unnecessarily cursing out the button switch that has no faults.
Check the Power Supply
No way, but the PC is not getting power after pressing the power button switch; undoubtedly, the first doubt goes for the PSU.
A bad power supply unit can be causing issues in supplying power to the motherboard. As a result, your PC power button not working eventually pc does not turn on.
This is the crappy thing you might be facing. And you’re thinking the right thing. Yes, you have to replace your PSU with a new one.
Wait! You can at least perform a test to check if the PSU is still the culprit or any other hardware issue is causing this.
But how to check computer PSU?
You can check the power supply in 2 ways
- Manually check using a multimeter
- Quickly check using a PSU tester
So, let’s go through all the ways so that you can check your PSU yourself if you are available with the essentials.
1. Check the PSU Using a Multimeter
Here, the things you need are-
- A multimeter &
- The PSU
- Screwdriver
Start with the steps for checking.
Step-1: Remove the PSU from the PC.
- Unplug all the power cables
- Using the screwdriver, loosen the screws from the PSU
- Take out the PSU slowly from the PC case.
Pro Tip: Must ensure to disconnect all the power cables. Otherwise, any voltage supply to the PSU can cause you short circuit.
Step-2: Prepare the Multimeter
- Now, prepare your multimeter. First, take the two wiring probes that come with the multimeter.
Connect the black wire to the common (COM) or negative probe and the red one that is the positive probe in voltage connection.
- After connecting the cables, turn on the multimeter if it has any switch. If there is no switch, then directly rotate the button towards the Voltage section.
Mostly the Voltage reading section is on the left side of the multimeter. As we are testing a PSU that works with voltage, so we have to test it by checking the Voltage reading.
Step-3: Short out 2 Pins on PSU
So, before starting the test, you must short out the ground and positive connection pin that is #15 and #16 pin of a 24-pin PSU that modern computer uses.
Locate #15 and #16 pin by inserting 2 ends of a wire on those two pins.
Pro Tip: Must use an insulated wire to avoid any short circuit to your body.
Step-4: Turn on the PSU
Turn on the PSU, and you’ll see the PSU fan is running.
Step-5: Test the PSU
- Take the negative wire of the multimeter and insert it in any ground pin of the PSU. Mostly #3, #5, #7, #15, #17, #18, #19, #24 pins are the ground pin. You can insert in anyone from these.
- After that, take the positive probe- the red wire and check by inserting it in each pin. If it shows an equal reference reading, then your PSU successfully passes this test.
Take help from this image below to find the exact pin circuit on your PSU.
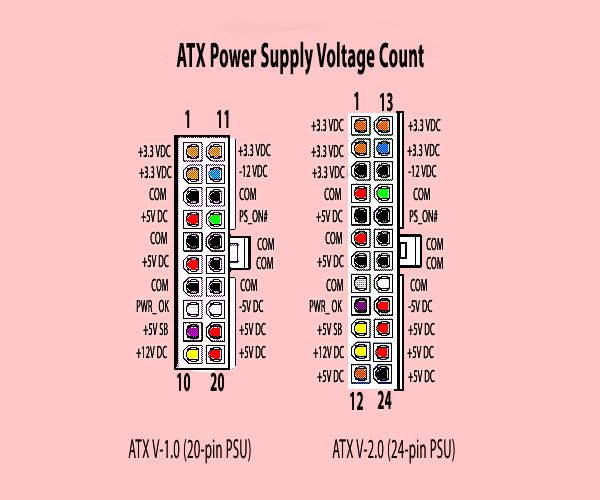
ATX V-2.1 new 24-Pin Power Connector Reading Reference
| Pin No. | Name | Wire Color | Specs |
| 1 | +3.3V | Orange | +3.3 VDC |
| 2 | +3.3V | Orange | +3.3 VDC |
| 3 | COM | Black | Ground |
| 4 | +5V | Red | +5 VDC |
| 5 | COM | Black | Ground |
| 6 | +5V | Red | +5 VDC |
| 7 | COM | Black | Ground |
| 8 | PWR_ON | Gray | Power |
| 9 | +5VSB | Purple | +5 VDC Standby |
| 10 | +12V1 | Yellow | +12 VDC |
| 11 | +12V1 | Yellow | +12 VDC |
| 12 | +3.3V | Orange | +3.3 VDC |
| 13 | +3.3V | Orange | +3.3 VDC |
| 14 | -12V | Blue | -12 VDC |
| 15 | COM | Black | Ground |
| 16 | PS_ON# | Green | Power Supply On |
| 17 | COM | Black | Ground |
| 18 | COM | Black | Ground |
| 19 | COM | Black | Ground |
| 20 | COM | White | -5 VDC (Optional. Removed in ATX 12V v2.01) |
| 21 | +5V | Red | +5 VDC |
| 22 | +5V | Red | +5 VDC |
| 23 | +5V | Red | +5 VDC |
| 24 | COM | Black | Ground |
ATX V-2.2 new 15-Pin SATA Power Connector Reading Reference
| Pin No. | Name | Wire Color | Specs |
| 1 | +3.3VDC | Orange | +3.3 VDC |
| 2 | +3.3VDC | Orange | +3.3 VDC |
| 3 | +3.3VDC | Orange | +3.3 VDC |
| 4 | COM | Black | Ground |
| 5 | COM | Black | Ground |
| 6 | COM | Black | Ground |
| 7 | +5VDC | Red | +5 VDC |
| 8 | +5VDC | Red | +5 VDC |
| 9 | +5VDC | Red | +5 VDC |
| 10 | COM | Black | Ground |
| 11 | COM | Black | Ground |
| 12 | COM | Black | Ground |
| 13 | +12VDC | Yellow | +12 VDC |
| 14 | +12VDC | Yellow | +12 VDC |
| 15 | +12VDC | Yellow | +12 VDC |
Check the Molex Connector
If your PSU is not faulty and all the reading is quite similar to the reference data,have a check on the Molex connector that connects to the motherboard.
- Connect the positive ground wire to the ground.
- Next, insert the positive red wire to the outside 2 pins where one should have the reading of +5 Volt, and the other should have +12V of voltage.
If all the reading comes with an enormous difference range with the reference, there is a fault in the PSU, and sadly we have to say your PSU needs replacement.
However, if your PSU can pass all the tests, then kudos! No need to replace the PSU. It is running fine.
How to Check the PSU Using a Power Supply Tester?
Does it seem too tiring? Is it just going over your head? Oh no! Wait, there is another easy way where you don’t need any multimeter and check the reading one by one.
Well. That can be a costly way, though. But if you can afford then let’s see the process.
Listen, do you need a good power supply tester? Try Fuhengli ATX power supply tester that supports all types of connectors.
Let’s show you the process of how to use a PSU tester and test computer PSU.
So, these steps are so relaxing to do as what you need here is
- The PSU
- The cables and
- PSU tester
How to Test?
- Connect your PSU ATX connector directly to the tester of one side and connect the 4-pin/6-pin/8-pin Molex connector on the other side.
- Turn on the PSU
- And see the results on the tester’s screen
If all the reading comes similar to the reference voltage reading, then what else do you need? PSU is all good.
In addition, the Power Signal reading (PG) should be 250 or more. If it is lower, the PSU is at fault.
Again if the screen shows “L.L” or “H.H” then your PSU needs replacement.
Also, connect your SATA drive to another portion on the width edge. See if the tester shows all the lights up for +12V, -3.3V, and +5V.
Replace The Motherboard
So, you checked the main power source, and there is no issue, checked your cables all are okay, checked your power button switch that is also working fine, and finally checked your PSU that is also has no faults.
Then, why computer power button not working? The fault is in the motherboard.
Be ready to replace the motherboard.
Well, if you’re not expert enough with the PC parts, ten take your PC to the reliable store to replace the motherboard.
Wrapping Up
Are you still here reading to the very last? So, you must have found out the main issue behind the power button not working PC not turning on!
The best solution is to bypass or replace the button switch if you’re sure that the button switch is the real one to curse.
Otherwise, the PSU or the motherboard can be kept at the remand cell for further inspection and make up your mind what fix you need as a further step.
Fix your PC power button not working issue and solve this sitting at home. You see, in this pandemic situation taking primary measures at home can be somehow time-saving and cost-saving too.
Enjoy your build!
More To Read:
- How to Connect Fans to Motherboard- Easy Installation Guide
- How to Turn off Facebook Messenger Notifications on Desktop within Minutes
- How to Test Mouse Sensor: Easy Guide for Online/Offline Testing
- Foxconn Motherboard Problems- What Are the Possible Causes and Solutions?
- Lenovo Yoga Plugged In, Not Charging- Solutions For Different Lenovo Yoga Laptops